

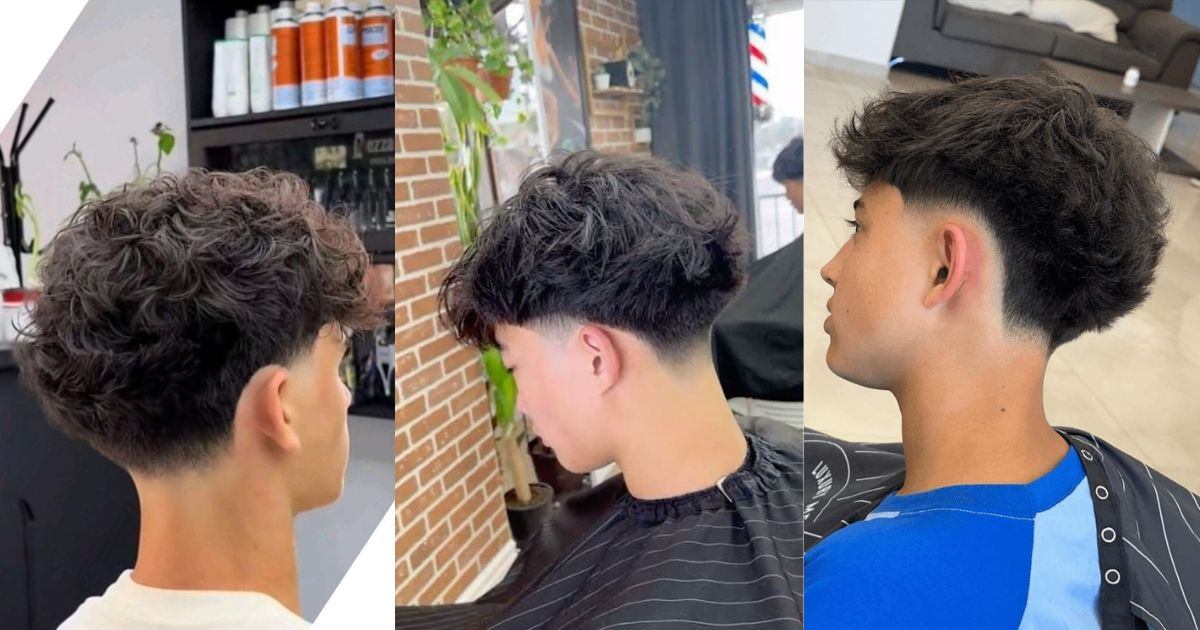
If you’ve scrolled past a dozen photos of guys with a full, wind-swept top and clean-edged sides, you’ve already seen a blowout taper. It’s one of the few men’s cuts that genuinely works on straight, wavy, curly, and coily hair alike, the trick is knowing which version to ask for and how to style it once you’re home. This guide breaks down every variant, every hair type, and every step so you walk out of the barbershop (or into your bathroom mirror) knowing exactly what to do.
We’ve pulled together barbering fundamentals, styling science, and real maintenance timelines so you’re not guessing. Whether you want the lowest-maintenance version or the boldest high taper with a textured fringe, you’ll find the exact words to use with your barber and the exact blow-dry routine for your texture below.
What Is a Blowout Taper? The Two-Part Haircut Explained
What is a blowout taper haircut, and who should get it?
A blowout taper pairs a soft, gradually shortening taper on the sides and neckline with longer hair on top that’s blown dry upward and outward for volume. It suits anyone who wants noticeable height and texture without the harsher contrast of a fade, and it works across nearly every hair type when the top length and styling routine are matched correctly.
The haircut is really two decisions layered on top of one another. The bottom half, the taper, is a matter of degree: how close to the skin the barber takes the sides, and how high up the head that shortening starts. The top half is a matter of length and texture: enough hair is left to catch air from a blow-dryer and stand up rather than lie flat.
Most barbers leave somewhere between 2 and 5 centimeters (roughly 0.8 to 2 inches) of hair on top. Any shorter and there’s nothing for the dryer to lift; any longer and the weight starts pulling the style back down by midday. The taper itself typically starts around 1 centimeter near the hairline and blends upward, so there’s no hard line, just a smooth transition from short to long.
Learn more:Low Taper Fade for Kids & Boys: 15+ School-Safe Styles, Barber Tips & Complete Parent Guide (2026)
Blowout Taper vs. Other Cuts
People often confuse a taper with a fade, or assume a blowout taper is just a taper with extra steps. Here’s the actual distinction.
| Feature | Regular Taper | Fade | Blowout Taper |
| Side blend | Gradual, hair-to-hair | Sharp, often to skin | Gradual, hair-to-hair |
| Skin exposure | Minimal to none | High, especially high/skin fades | Minimal to none |
| Top length | Any length | Any length | 2–5 cm minimum, kept for volume |
| Styling requirement | Optional | Optional | Required (blow-dry to realize the shape) |
| Overall vibe | Clean, understated | Bold, high-contrast | Voluminous, textured, polished |
The one thing that separates a blowout taper from a plain taper with long hair on top is the styling step. Skip the blow-dry and the cut just reads as a slightly shaggy medium-length style, the “blowout” is doing half the work.
Historical Context
The high-volume top paired with tight, tapered sides traces back to barbershop culture in the 1990s, when the look spread through Black and Latino communities in cities like Brooklyn and Miami before crossing into mainstream men’s grooming. Its current wave of popularity owes a lot to short-form video, where the “reveal” moment, flat, damp hair transformed into a full blowout, makes for satisfying content and has pushed the cut back into heavy rotation at barbershops everywhere.
The 5 Main Blowout Taper Styles: Low, Mid, High, Textured Fringe & Beyond
The height at which the taper starts changes the entire personality of the haircut, even when the top stays identical. Here’s how each version reads, and who tends to gravitate toward it.
Low Blowout Taper: The Easiest Entry Point
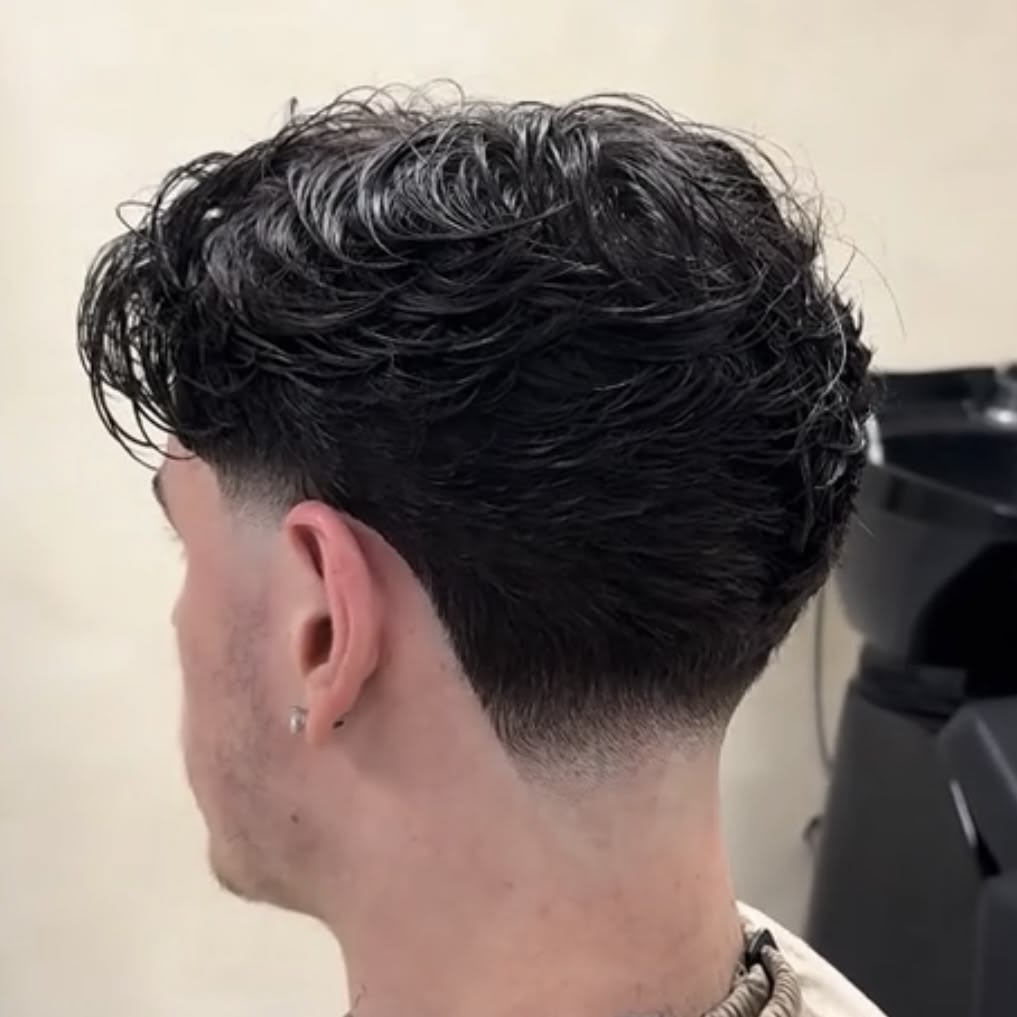
The low blowout taper keeps the fading action close to the ears and neckline, leaving most of the sides and back looking naturally longer. It’s the most forgiving version for first-timers, workplaces with conservative dress codes, and anyone who wants the style without a dramatic before-and-after.
Because so little skin or short stubble is visible, regrowth is far less noticeable between cuts, which also makes it the lowest-maintenance option of the five.
Mid Blowout Taper: The Balanced Sweet Spot
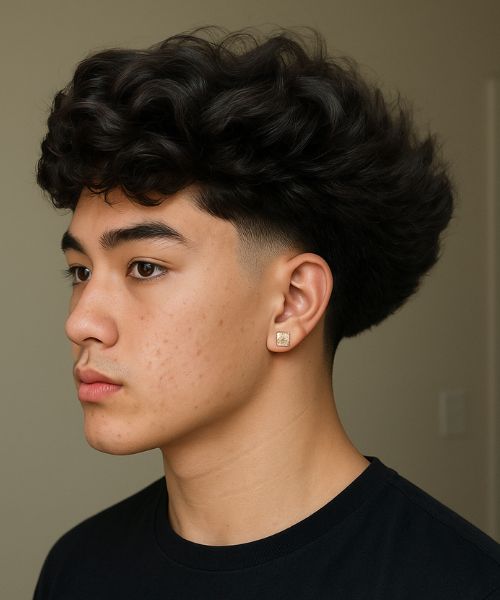
Starting around the temples, the mid taper is the most commonly requested version because it splits the difference, noticeable shape without looking like a dramatic style change. It reads as put-together in an office and sharp enough for a night out, which is why most barbers will default to this height if you don’t specify otherwise.
High Blowout Taper: The Bold Statement
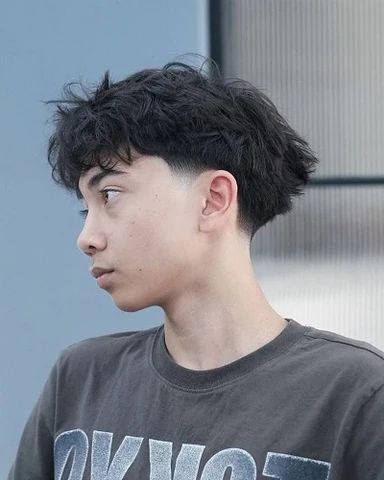
A high blowout taper begins the graduated shortening near the upper sides of the head, creating far more contrast between the sides and the voluminous top. It draws the eye upward, which is useful for round or square face shapes, but it also grows out faster and needs tightening up every couple of weeks to stay sharp.
Textured Fringe Blowout Taper: The Viral TikTok Version
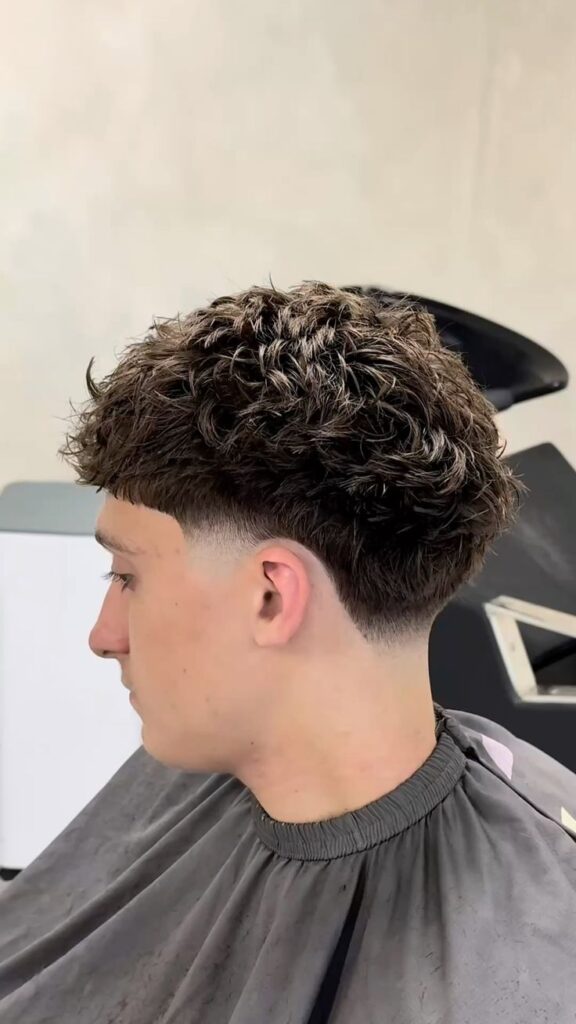
This variant keeps the same tapered sides but cuts the top with heavy texture and a forward fringe instead of a fully swept-back blowout. The fringe is point-cut or razored for a broken, piecey finish rather than a blunt line, which is what gives it that “effortless” look that performs so well on video.
It works particularly well over a mid or low taper, since the fringe itself already adds enough visual interest without needing the extra height contrast of a high taper.
Blowout Taper Perm or Curly Variant: For Natural Curl
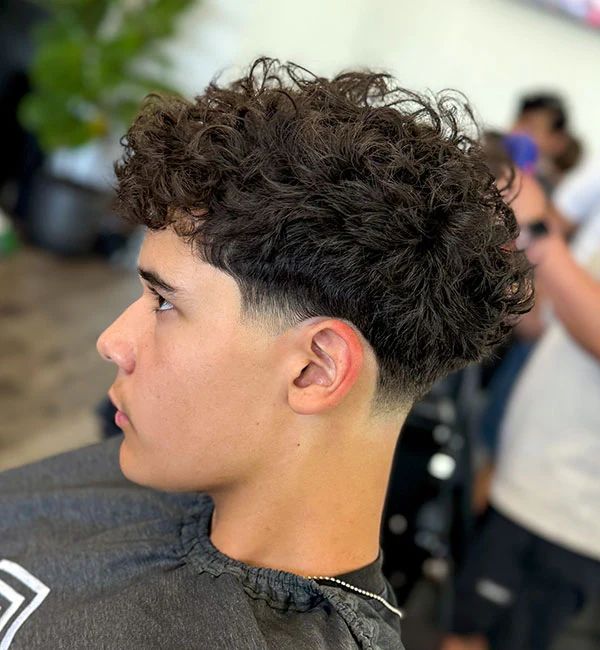
Guys without natural curl sometimes get a loose perm on top specifically to achieve the blowout taper’s volume without a daily blow-dry. For those with natural curl or coil already, this “variant” simply means leaving the curl pattern untouched on top and cutting the taper to complement it rather than fighting it with heat styling.
Variant Comparison Table
| Style | Taper Start Point | Maintenance Frequency | Best For |
| Low Blowout Taper | Near ears/neckline | Every 3–4 weeks | First-timers, conservative workplaces |
| Mid Blowout Taper | Temples | Every 3 weeks | Most face shapes and settings |
| High Blowout Taper | Upper sides | Every 2–3 weeks | Bold looks, round/square faces |
| Textured Fringe | Low or mid | Every 3–4 weeks | Casual, trend-forward styling |
| Curly/Perm Variant | Low or mid | Every 4–6 weeks | Natural curl or those wanting less daily styling |
Does a Blowout Taper Work for My Hair? A Guide by Hair Type
Straight Hair: This Requires the Most Styling Effort
Straight hair has no natural lift, so the volume in a blowout taper has to come entirely from the cut and the blow-dry. Barbers typically cut in more texture on top, point-cutting or thinning, so the hair has something to grip onto when it’s dried upward, plus a volumizing mousse or sea-salt spray before styling.
Wavy Hair: The Goldilocks Texture
Wavy hair already has partial lift built in, so it takes the least effort to style of any texture and often needs only a quick two-minute blow-dry, or none at all on a good day. This is the texture most blowout taper photos online are actually showing, since the natural wave does a lot of the heavy lifting.
Curly Hair: Maximize Natural Volume
Curly hair brings volume by default, so the goal shifts from creating lift to preserving curl definition instead of blowing it out flat. A diffuser attachment plus curl cream, applied to soaking-wet hair, keeps the natural pattern intact while still adding the fullness the style is known for.
Afro/Coily Hair: The Confidence Cut
Coily hair provides the most dramatic contrast against a tight taper, since the round, full shape on top sits directly against the closely tapered sides with almost no transition needed. A pick and a light, water-based mousse are usually all that’s needed to shape the top, no heat tools required.
Hair-Type Styling Comparison Table
| Hair Type | Natural Lift | Key Product | Daily Styling Time | Heat Tool Needed |
| Straight | None | Volumizing mousse or sea-salt spray | 8–10 minutes | Yes, blow-dryer with round brush |
| Wavy | Moderate | Light texture spray | 2–5 minutes | Optional |
| Curly | High | Curl cream + diffuser | 5–8 minutes | Diffuser only |
| Afro/Coily | Highest | Water-based mousse | 3–5 minutes | No |
Which Taper Height Works Best for Your Face Shape? A Decision Framework
Round Faces: Go Mid or High to Add Vertical Length
A mid or high taper pulls visual weight upward and away from the cheeks, which elongates a round face and keeps the horizontal width of a lower taper from making it look wider.
Square Faces: Low or Mid Taper with Soft Texture
Square jawlines are already strong, so a low or mid taper with softer, textured top length balances the angularity instead of adding even more hard edges near the sides.
Oval Faces: Any Height Works; Pick by Maintenance
Oval face shapes have the most flexibility here, every taper height looks proportionate, so the decision really comes down to how often you’re willing to get a touch-up.
Long Faces: Stay Low or Mid; Keep Some Width
A low or mid taper that keeps some width and length at the sides prevents a long face from looking even more stretched out, which is what a high, narrow silhouette tends to do.
What to Tell Your Barber: 5 Blowout Taper Scripts by Height & Hair Type
Essential Communication Elements
Every good barber request for this cut needs four pieces of information: the taper height (low, mid, or high), the amount of length to leave on top in inches or centimeters, whether you want a fringe or a full sweep-back, and your hair type so they know how to cut the texture.
Barber Scripts by Variant
- Low taper, straight hair: “Low taper on the sides, blending into the neckline. Leave about 2 inches on top and cut in some texture so it has movement when I blow-dry it.”
- Mid taper, wavy hair: “Mid taper starting at my temples. Keep around 2 to 3 inches on top, point-cut the ends for texture, and blend it smoothly into the taper.”
- High taper, thick hair: “High taper starting near the top of my ears. Leave 2 to 2.5 inches up top with heavy texturizing so it doesn’t sit heavy.”
- Textured fringe, any hair type: “Low or mid taper on the sides, and on top cut a textured fringe I can push forward, piecey ends, not a blunt line.”
- Curly hair, natural texture: “Low taper on the sides only, don’t touch the curl pattern on top, just shape it round and even out any stray length.”
Reference Photo Guidance
Bring two photos rather than one: a front-on shot showing the top volume and fringe shape, and a side-profile shot showing exactly where the taper starts. Barbers read side profiles far more accurately than verbal height descriptions alone.
Optional Clipper Guard Reference
| Taper Height | Starting Guard (approx.) | Blend Zone |
| Low | #1–#2 at nape | Ears to neckline |
| Mid | #2–#3 at temple line | Temple to ear |
| High | #3–#4 upper sides | Crown to temple |
What NOT to Say
Avoid vague phrases like “just a little off the sides” or “you know, the popular one”, barbers see dozens of variations of this cut a week, and specifics about height and top length are what actually prevent a miscommunication.
How to Style a Blowout Taper at Home: Step-by-Step Blow-Dry Guide
General Blow-Dry Principles (All Hair Types)
Always start from towel-dried, not soaking-wet hair, apply a heat protectant before any hot air touches your head, and dry against the direction you want the final style to fall so the roots get real lift rather than just drying flat.
Straight Hair: 5-Step Blow-Dry for Maximum Lift
- Towel-dry hair to damp, then apply a volumizing mousse from roots to ends.
- Rough-dry on medium heat until about 80% dry.
- Section the top and use a round brush to lift each section at the root.
- Direct the dryer nozzle downward into the roots while pulling hair upward with the brush.
- Finish with a 10-second blast of cool air per section to lock the shape in place.
Wavy Hair: 2-Minute Blow-Dry (or Skip It)
Scrunch a light texture spray or sea-salt spray through damp hair, then either air-dry completely or give it a quick 60–90 second diffuse on low heat, scrunching upward as you go.
Curly Hair: Diffuser Technique to Preserve Definition
Apply curl cream to soaking-wet hair, cup sections in the diffuser bowl, and hold each section at the scalp without moving it around, which prevents frizz and keeps individual curls intact.
Afro/Coily Hair: Pick & Mousse Method
Work a water-based mousse through damp hair, let it air-dry or sit under a low, diffused heat setting, then use a pick to lift and shape the top from underneath once fully dry.
Styling Troubleshooting Reference
| Problem | Likely Cause | Fix |
| Top falls flat by midday | Product too heavy, or not enough on top | Switch to a lighter mousse; ask barber for more length at next cut |
| Frizzy, not full | Diffusing too roughly or using towel to dry curls | Diffuse without moving sections; switch to a microfiber towel |
| Uneven volume | Rough-drying without sectioning | Section hair into 3–4 parts before styling |
| Style looks greasy fast | Too much product | Use a dime-sized amount, build up gradually |
How Long Does a Blowout Taper Stay Fresh? The 4-Week Timeline
Day 1–3: Fresh & Sharp
The taper line is at its cleanest and the top volume is easiest to style since the barber has already shaped the texture for you.
Week 1: Still Sharp
Minimal visible change; the taper blend still looks crisp and daily styling takes the same amount of effort as day one.
Week 2: Edges Start Softening
Regrowth begins to soften the taper’s blend zone, especially on high tapers, and the top may start needing slightly more product to hold shape.
Week 3: Visible Softening
The contrast between sides and top narrows noticeably; this is the point most people book a cleanup trim if they got a high or mid taper.
Week 4: Blend-Out / Time for Full Refresh
The taper has mostly grown out into a uniform length, and the cut needs a full re-cut rather than a touch-up to restore the original shape.
Touch-Up vs Full Cut: Quick Reference
| Timeframe | Low Taper | Mid Taper | High Taper |
| 2 weeks | No action needed | Optional touch-up | Touch-up recommended |
| 3 weeks | Optional touch-up | Touch-up recommended | Full cut recommended |
| 4 weeks | Full cut recommended | Full cut recommended | Overdue for full cut |
Regional & Personal Factors
Hair grows faster in warmer climates and for some ethnic hair types than others, so these timelines can shift by several days in either direction, track your own regrowth rate over two or three cuts to find your personal rhythm.
Common Maintenance Mistakes
- Waiting until the taper has fully grown out before booking, which means starting over instead of a quick touch-up.
- Skipping neckline and edge cleanups between full cuts.
- Not telling the barber it’s a touch-up, which can result in them taking off more than needed.
Putting It All Together: Choose Your Blowout Taper by Hair Type AND Face Shape
Master Decision Matrix
| Hair Type | Round Face | Square Face | Oval Face | Long Face |
| Straight | Mid taper, textured top | Low taper, soft texture | Any height | Low/mid, keep some width |
| Wavy | High taper | Mid taper | Any height | Mid taper |
| Curly | Mid/high taper | Low/mid taper | Any height | Low taper |
| Afro/Coily | Mid/high taper | Low taper | Any height | Low taper |
Example Personas: Decision Stories
- The office professional with wavy hair and an oval face: Goes with a low or mid taper for easy upkeep and workplace-safe styling, since an oval face doesn’t need the extra height.
- The college student with curly hair and a round face: Chooses a mid taper to elongate the face while keeping the diffuser routine simple.
- The creative freelancer with straight hair and a square jaw: Picks a low taper with a textured fringe to soften strong angles without adding daily styling time.
Your 5-Step Decision Process
- Identify your natural hair type and how much lift it gives you without styling.
- Match your face shape to the taper height that balances its proportions.
- Decide how much daily styling time you’re realistically willing to spend.
- Pick a variant (standard blowout, textured fringe, or curly variant) based on the look you want.
- Write out your barber script using the height, top length, and texture details from this guide.
Is a Blowout Taper OK for Work? A Quick Guide by Variant & Industry
Acceptability by Variant & Setting
| Variant | Corporate/Formal | Business Casual | Creative/Casual |
| Low Blowout Taper | Yes | Yes | Yes |
| Mid Blowout Taper | Usually yes | Yes | Yes |
| High Blowout Taper | Case-by-case | Yes | Yes |
| Textured Fringe | Case-by-case | Yes | Yes |
| Curly/Perm Variant | Usually yes | Yes | Yes |
Variant Assessments
The low and mid tapers read as neat, styled haircuts rather than a trend-driven statement, which is why they clear most dress codes without a second look. The high taper and textured fringe skew more toward creative or casual industries simply because of the added contrast and volume, though a well-groomed version of either can still work in relaxed corporate environments.
Industry-Specific Guidance
- Finance/Law: Low or mid taper, minimal fringe, kept tight on the neckline.
- Tech/Startups: Any variant generally works, since dress codes here are usually the most relaxed.
- Creative fields (design, media, entertainment): High taper and textured fringe are common and well-received.
- Client-facing service roles: Low or mid taper is the safer default across most companies.
5 Blowout Taper Mistakes (And How to Avoid Them)
Mistake 1: Not Enough Length on Top to Begin With
If a barber leaves less than 2 inches on top, there simply isn’t enough hair for a dryer to lift, no matter how good the technique is, always confirm top length before the clippers start on the sides.
Mistake 2: Taper Taken Too High Without Intent
A high taper that wasn’t actually requested can leave too little hair on the sides to grow out gracefully, forcing more frequent trims than planned, be specific about height using the scripts above.
Mistake 3: Wrong Product for Your Hair Type
Using a heavy pomade on curly hair or a light mousse on very coarse, straight hair leads to either weighed-down curls or a flat top that won’t hold shape, match the product to your texture using the comparison table earlier in this guide.
Mistake 4: Skipping Daily Blow-Dry and Expecting the Cut to Carry Itself
The blowout taper is named for the styling step, not just the haircut shape, so skipping it regularly will make the cut look like an unstyled medium-length trim within a day or two.
Mistake 5: Not Scheduling Maintenance Ahead
Waiting until the taper has fully blended out before booking a follow-up means starting the growth cycle over instead of doing a quick, cheaper touch-up, book your next appointment around the two-to-three-week mark while the cut is still fresh in your mind.
Frequently Asked Questions
Is a blowout taper the same as a fade?
No. A taper blends gradually with hair-to-hair transitions, while a fade blends higher up with more visible skin.
Can straight hair actually hold a blowout taper?
Yes, but it needs texture cut into the top and a daily blow-dry with volumizing product to hold the shape.
How much length do I need on top for this cut to work?
At least 2 inches (about 5 centimeters) is the general minimum for the blow-dry to create real lift.
How often do I need a touch-up?
Every 2–3 weeks for high tapers and every 3–4 weeks for low tapers, depending on your hair’s growth rate.
Does a blowout taper work for curly or coily hair?
Yes, curly and coily textures often need the least extra styling since natural volume does most of the work.
Conclusion
A blowout taper works across nearly every hair type and face shape once you know which height and top length to ask for. The style hinges on two things: a barber who understands exactly what taper height you want, and a home styling routine matched to your hair’s natural texture rather than a generic routine copied from someone else’s hair.
Use the scripts, tables, and decision framework in this guide before your next appointment, and treat the blow-dry as part of the haircut rather than an optional extra. Get both right, and the blowout taper becomes one of the lowest-effort, highest-payoff cuts you can maintain long-term.